Tuesday, February 12, 2019

Creative Team? Count Me In!

Hey there readers!

So, I branched out of my comfort zone a little bit and applied to be on the Creative Team for The Digital Press a few weeks ago......and made it!


It's official! I get to make and submit my pages using their products for the world to see! They sell digital scrapbook kits, papers, stickers, pocket cards, etc. in their Shop, and when I see products that will work well with the pages I'm already creating, I whip one up and feature their goodies on my pages!

Fun, huh!

I've already made a couple of pages, but it's been a little outside my comfort zone, since some of their products can be used in the Project Life app (like the pocket cards)-bringing them in as photos in the page pockets, but a lot of the products they sell are digital products which means I am taking a crash course in using a photo-editing program called Photopea to be able to add the different scrapbook elements to my pages in combination with what I'm doing in the PL app.

Once I get a better feel for just what this new process is, I'll post some how-to instructions like I have in the past. But don't worry, I'm still going to be making pages with the PL app, but now I'm not going to be limited to what is available with in the app, kit-wise!

I'm excited!

Here's an example of what I've made so far with The Digital Press products:


The large alphabet letters and black/white cards on this page are pieces from the digital designer ninigoesdigi. Super fun to work with these amazing products. Click the links to see these products up close!

Feel free to check out The Digital Press and all the different parts of their website: The Shop, The Forums, The Gallery of page examples, etc!  Plus they've got an amazing $1 sale going on ALL MONTH LONG for dozens of digital kits and embellishments!

Thanks friends!

Saturday, February 9, 2019

Backing Up Finished Pages - Both JPG versions and Editable Backups

This blog post is about two things really: saving and backing up your Project Life app pages (both the JPG version of the page, and the editable backup version), and then how to bring an editable backup version back into the app after it's been saved, should you ever need to make corrections.

Saving and Backing Up PL App Pages

So, you've taken the time to create an awesome scrapbook page in the Project Life app--now what?

If you never plan to delete the page out of your Project Life app, then fine. You're done. Go on with your life. But eventually, you'r app is going to start running slower and slower because it's taking up so much "space" on your device.

But if you ever wanted to do anything in the future with your scrapbook pages (besides looking at them on your device) like print them, or email them, or save them permanently, or post them online; then you really should save them outside the app, and back them up.

I'm going to share what my process is. Is it the the only way to do it? Nope. Is it the best way to do it? Well, it works for me. Maybe you have additional ideas or ways that you like do things, but like I said, this is MY process, and I'm sharing it with you.

First, I create a page. (Sometimes easier said than done, as I often spend way too much time deciding on cards/fonts/colors)

My finished page. Nothing too fancy, just DONE! :)

Then, I export a 12 x 12 version of the page and save it in my Dropbox account.


On Dropbox, I have Project Life folder that I've subdivided into additional folders by year.  I also have an Unsorted folder that all my saved pages go into initially.

When I export the page to Dropbox, I take the time to name the page. The Project Life app automatically gives the page a name and the .JPG extension, but I always change that default name to include the year, then a hyphen, then a description of the page. In this example it's 2000-Easter Egg Hunt.jpg.
I pick my UNSORTED folder within Dropbox, change the file name, and then tap Save in the upper right corner.
And immediately after that, while I'm in that "saving mode", I also export an Editable Backup to the same UNSORTED Dropbox folder, with the name page name, but this time, since it's an editable backup, instead of the .jpg file extension, is has a .plpage extension. Applying the right extension is done automatically in the app depending on whether you are exporting a page or a editable backup.


Once both the page JPG and the editable backup are in Dropbox, when you view them through the Dropbox app (or on the computer in Dropbox) you can see a thumbnail version of the .jpg file, but not of the .plpage file.


Now, because I only use the free version of Dropbox, that doesn't have a ton of storage space (I think only like 5 GB or so), I don't keep the 12 x 12 .jpg versions of the page in Dropbox for very long. Image files tend to take up a lot of space, more so than the .plpage versions do at least.

I download the 12 x 12 .jpg versions from Dropbox to my computer, and then store them on Google Photos in albums organized by year. I've talked about my Google Photos organization process in a previous post.

Once I've uploaded the 12 x 12 .jpg versions to Google Photos, I delete the page from my PL app, and delete the .jpg version from my Dropbox. I only keep the editable backup copies in Dropbox.

Then I move those editable backup copies out of the Unsorted folder and into corresponding yearly folders I've made my Dropbox.

Here's an example of my 1983 folder on Dropbox. You can see that I have two editable backup files stored here.
But why do you need to keep an editable backup if you have already saved the .jpg version on Google Photos?

Good question. Maybe for you, you don't need or want to. That's fine. To each their own. But for me, it is inevitable that I will have a typo in my journaling on a page that I only see after the fact (even though I've read that journaling card like 235 times!)

Or maybe, in the newest Project Life app update, an amazing new card kit comes out that will work so much better than what I used originally. Basically, the ability to save an editable backup version of your pages is so that you can (if you want to) pull the page back into the Project Life app and make edits, WITHOUT having to recreate the whole page again from scratch. The editable backup preserves your card choices, your fonts, you photo editing--everything from when you made the page and exported it the first time.

Some people export their pages and then delete it off their app and are done. Good for you if your process includes just those steps. Me, I like to export and save a jpg version and an editable version---just in case I need to fix it later. I have the storage space to do that, and I'm just anal enough that typos would bug me too much if I didn't fix them!

Restoring an Editable Backup to the Project Life App

So, let's say that you do find a typo and want to go back and fix it after the fact. How do you do it?

To pull an editable backup page back into the Project Life app, you have to open the location where you have saved that backup, which for me is in Dropbox. I open the Dropbox app on the same device that I have the Project Life app on, and I go to the yearly folder where editable backup version is saved.

Let's say that I found a typo on this 1983 Let George Do It page. 
I tap the title of the page layout and it starts to try and open, but since Dropbox can't "read" the .plpage file extension, it can't show you a preview of what the page looks like, so it  just shows the name of the file.


Then I tap the three little dots icon on the top right corner of the Dropbox app, and choose Export.


Then I choose Copy to Project Life.


That opens up the Project Life app, and the PL app will ask if you'd like to save the page to your library.


I tap Yes, and the page is added to my Completed Pages library.

Depending on when you originally saved the page is where it will appear in your list of Completed Pages. In this case, the page was originally saved 49 weeks ago! So you may have to scroll to find your page.
Once the page is back in the PL app, you can open it and make changes to any part of the page: photos, journaling, card choices, fonts, etc.

Then, don't forget to re-save and re-export the corrected version as an jpg version and as an editable backup. If you want to use the same file name as you originally did, when you save it, it should ask you if you want to replace the old one (just like it does in other computer programs). Say Yes to that, and you won't have to worry about having two version, one with typos and one without!

So that's my process. If it works for you, great. Feel free to use it with my blessing! ;)  If you find a way that works for you, I couldn't be happier for you. Just sharing what work for me.

Thursday, January 10, 2019

The Subtle Tilt - 14 Easy Steps to Create Lively Pages

One quick and easy thing you can do to your pages that will give them a totally different look, is to do what Meagan Johnson (find her @thepracticalscrapper on Instagram) calls, "The Subtle Tilt."

"The Subtle Tilt" requires using PicTapGo, which is an in-app purchase in the Project Life app, but well worth it for this technique.

To do it, first create a page like you would normally do. It can be any template, and contain any mixture photos, journal cards, and filler cards. The only thing you'll want to be aware of, is that when we get to the "tilting" part, you'll lose a little bit of your page's edges. So if you have journaling cards or FFT writing close to the edges of your page, you'll want to move those to pockets more in the middle of page. Don't worry, I've planned an "oh no, it's cutting off" example into my demonstration pictures below! :)

Step 1: Create your page
After you have created your page, export it and save it to your camera roll. Then go into the collage section of the app, select the 12x12 square template, and bring your page back in as a photo.

Step 2: Export your page

Step 3: Save the page to your camera roll

Step 4: Open the Collage section of the PL app

Step 5: Select the 12x12 square template

Step 6: Bring your page back in as a photo
Once you have your page back in as a photo, tap the Photo Editing Options button and select Edit In PicTapGo.

Step 7: Tap the Photo Editing Options button

Step 8: Edit in PicTapGo
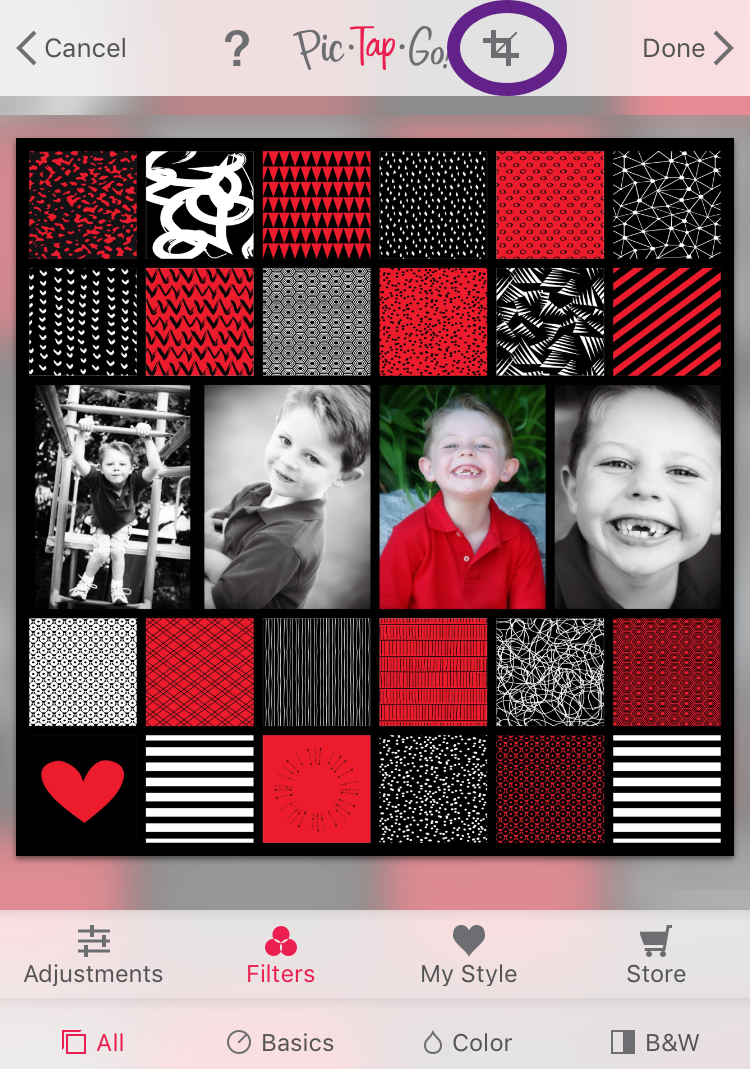
When PicTapGo launches, up at the top of the screen, next to the logo there is a Crop button. Tap that.

Step 9: Access the Crop tool

You'll have two tab options at the bottom of the screen. Tap on the Rotate tab.

Step 10: Access the Rotate options

You have some preset rotation options and a slider bar. I like to tap and hold on the slider bar, move left and right and watch how the whole image tilts.

Step 11: Tilt 'til your happy with it! :)

For this page, I've tilted it about 5 degrees or so--the "subtle tilt."

Ok. Notice how my bottom left corner slot (the one with the heart) is now cut off according to the yellow crop marks (yellow meaning anything outside of this line will be cut off). That's what I was saying earlier about making sure your journaling or FFT boxes aren't on the edges of your page, because depending on how much you tilt them, they'll get cut off.

Step 12: Look for anything that may be cutting off

If what's getting cut off really matters to you, you'll have to go back to your original page (before you exported it as a 12x12) and move pockets around--then re-export, bring it back in again as a 12x12 collage, and reopen PicTapGo.

For this example, that's what I did. I moved the heart square (I counted, it only took me 34 seconds to go back, move the square, re-export--the whole nine yards). Not too difficult to get something that won't be cut off!

Step 12: Readjust your page if you need to
Once your satisfied with the "subtle tilt", tap the Apply button at the top right of the screen, and then Done (again, top right).

Step 13: Finish it off in PicTapGo and return to the PL app
Now you're back in the PL app, your page is tilted within the 12x12 square, and you can now add FFT (if you choose to) to this nearly finished page.

Step 14:  Sit back and admire your creative genius!
I decided to add my son's name to the page before saving it and calling it complete!

Give the "subtle tilt" a try! I think you'll like it!


Thursday, January 3, 2019

I Made My Own Filler Cards!

Happy New Year Everyone!

You guys will never guess what I did! But if you know me, it's most likely something that takes the Project Life App to a whole different level--but it isn't anything that is very hard. Even YOU can do it!

For the longest time, I've wanted a specific kind of card kit to be included in the app. I wanted a kit that could be used to document those photos I have from vacations and/or travel that I've done within the United States.

Sure, there's the Road Trip Themed Cards and the Travel Themed Cards, but those are both kind of GENERIC and boring. I want a card set that I could use to document a road trip through Utah, Colorado, Kansas and Missouri!

So..... I decided to make my own---and it really wasn't that hard, just took some time.

First things first. A little disclaimer, that what I'm about to show you requires the in-app purchases of both Free Form Text (FFT) and the ability to upload your own fonts to the PL app.

If you're still with me, here we go!

To begin with, I needed a font that contained the shapes of the different states. I did a quick Google search and found one on a site called Font Squirrel.  It's a font called StateFace. It's a dingbat font where each letter you type corresponds to a state shape. A = Alaska, a = North Carolina, B = Alabama, b = North Dakota, etc.

I downloaded that font and saved it to my Project Life app. If you haven't ever uploaded your own fonts to the PL app, here's a helpful group of steps written by Jenna from the Simply Project Life Facebook group:


Once I had that states font, I was ready to create!

I wanted the cards I created to be some sort of red, white, and blue combinations (because hello, USA!), so I started off in the Collage section of the app...

...and selected the 4x6 A template. 


Using this template allows you to pull in Project Life cards into the space. Other templates in the collage section only allow you to pull in photos. Then I pulled in a plain red card from the PL app's Americana Themed Cards, to use as my backdrop.


My vision for these cards is to have a large state shape that I can either journal on, or add FFT to (like a star or a dot to indicate different cities), to help tell the story of the scrapbook page I will create.

First I added a FFT box to the card by tapping the plus sign (+) button.


Then, I selected the StateFace font I uploaded in my list of fonts, and typed the corresponding letter for the state I wanted to appear (in this case, A for Alaska!)


I knew that I wanted the state to appear as big as possible on the card, so I tapped and dragged the "dot" button on the lower right corner of my FFT box, and enlarged the box so the state filled the card. Then I added another FFT box (tapping the same plus sign button as when I originally added my first FFT box) that I could use to write the name of the state with.


There are a lot of different things you can do at this point with that second text box. One option is to change the font color to something other than white, so your writing stands out against the white of the state shape. Since I am using a red card from the Americana kit, I have those text color options available to me, so I chose the dark blue.

Now, you have even more things to decide! How big do you want that text? Big enough to cover the state shape?


I guess if the goal is to create a title card for use on your page, this is definitely one way to go. Another idea could be to only enlarge the text a little bit, and maneuver it to a location on the card where it doesn't cover up any part of the state. That way you can add cities you traveled to, or cities that have to do with the pictures on your page.  And of course the fonts you use to do that are completely up to you!

Then it's just a matter of exporting and saving the cards to your camera roll, and then plugging them into your pages! Here's a couple of examples of how I've used these cards on my pages:


Once you get the hang of how to create you own cards, you can either make up cards as you need them, or, if you are like me, spent a couple of hours every day for a week and make yourself a whole set!

Yep, I made a USA kit of my own. It has 257 different cards (one for each state, including the District of Columbia) in a 4x6 horizontal, 4x6 vertical, 6x8 vertical, and 6x8 horizontal size with the state as big as it would go on the card, with the name of the state written out--all in varying assortments of red, white, and blue!


Then I made another set of each state in a 12x12 square size, with the state shape and the state abbreviation overlayed on top of the shape.


Now I'm set for any and all vacation/road trip scrapbook pages I'll make in the future. And if for some reason the red, white, and blue doesn't go with the color scheme on my page, I know I can easily swap them out for matching colors if needed!

Hope this has inspired you to try creating some filler cards of your own when you find that the Project Life cards just don't have what you need!


Saturday, December 1, 2018

A Mixture of Methods Makes for a Marvelous Memory-filled Page

If you've been reading this blog, you know that I share different methods on how to create scrapbook pages that capture specific moments in time.

Here's a page that I worked on this afternoon from an old photograph I found while moving my mom into her new house over Thanksgiving weekend. The photograph was one from the mid 70s, old, brittle, and yellowed with age. I took that photo to my father-in-law, who worked some PhotoShop magic on it to get it to shine like the day it was first developed!

Before
After

So the first thing I did was to pull the photo into template that would feature the photo prominently. I chose Big Shot 14 Template for that.


Next I used a Disney Emoji of Captain Hook's Hook in the lower journaling pocket. You can read about how I go about using Disney Emojis on my scrapbook pages HERE.


Then I exported the whole page (even with  the empty card slot). When you have empty card slots, during the exporting process, the blank spot is filled in with whichever background color you have selected for the page, which in this case, is white. I saved the page as a photo, and then brought it back into the app and placed it in the center slot of the Squared Away 16 template.


I chose a purple-pink color plain card from the Bloom Edition card set and put those plain cards in the slots surrounding the picture. Then I exported that whole page as a photo, because I wanted to create a layered edge effect on the page. You can read about that process HERE and HERE.


Once I had the purple around my page I exported that whole page and brought it back into the PL app via the orange collage section as a 12 x 12.

Collage section of the app

12x12 card slot
I  brought the photo into this 12 x 12 card slot and pinch and zoomed so that the purple border is a narrow edge all the way around.


Then, using FFT I wanted to add text to all of the white area of the page.


It took a little manual work to get the text to flow around the hook shape. I had to add extra spaces in between words, add in manual returns and realign things every time the line wrapped, but in the end, I really like how it turned out!


I had a little extra white space at the top, so I added a pirate flag emoji (just from the Apple emojis) using FFT........and DONE!