But I'm back today because I was inspired by some new digital scrapbook products I came across as part of my work on The Digital Press creative team. Laura Passage has released some great pocket card kits that can help to fill the void left by the Project Life App not having a Project 52 (they used to go a card kit for weekly scrapbook pages--hence the 52 for 52 weeks in the year) or Project 12 (same concept, but monthly) kit this year.
I know there are hundreds, maybe even thousands of scrapbookers out there who would love a new kit to help them create their pages, no matter if they do them weekly, or monthly, or just sporadically.
But I digress. Laura Passage, a designer (and owner) of The Digital Press has created these card kits that you can use (and customize) for daily, weekly, and monthly scrapbooking. I thought I'd walk through some ways you could use them, and then let you loose in the store to purchase them! You won't be sorry, I promise!
Each of the card kits has two versions of each card. One in 3x4 size and one in 4x6 size - and they come in horizontal and vertical styles! The 3x4 cards are vertical and the 4x6 are horizontal.
There is a Daily kit, where each card has a day of the week abbreviated in large block text, and then the whole weekday is also printed in script.
The Weekly kit is similar. The week numbers (1-53....because it's a leap year!) are in the block text and the word "week" is written in script.
And finally, the Monthly kit. This is the one I am personally going to use this year. The month name is abbreviated in block text, and the the month name is written in script.
There's a couple of ways you can use these cards. First, after you purchase and download the kits, you'll have to save the cards to your computer somewhere--or online in Dropbox or Google Drive--somewhere you can access them from, and then pull them into your Project Life app as photos.
I have made a Youtube video about how to pull in cards from Google Drive that you can watch HERE.
You are going to be limited to just pulling in the cards as they are by default: gray colored block letters for the days/week numbers/months on a white background, with the script showing in black.
In this example, I pulled in the Jan-Apr cards into the middle pockets of the PL Design A template, changed the background to black, and left all the other pockets blank (so they filled in with the background color):
Pulling the cards in and placing them in your desired pockets the same way you do with photos how you can use these kits if you just want to stick with the Project Life app, and not get into anytthing more "digital". Which is a perfectly fine way to do things. Just know that you are limited to these black/white/gray cards the way they look here.
But also included with these kits you can purchase are the PSD files. PSD files are for use with Photoshop - or a free online alternative, Photopea.com (Search for Photopea within this blog for more posts about how I use this great tool to do some fancy things, without having to shell out the big bucks for Photoshop!)
With these PSD files, each card is made up of different layers: a background color, the block letters, and the script letters.
I'm going to talk in terms of using Photopea.com to work with these PSD files, since that it what I've learned how to use on my own. Photoshop is very similar, and if you already know how to use Photoshop, then you probably don't need to continue reading unless you want to! ;)
Okay, as I was saying, the PSD files are made up of different layers, and you can manipulate those layers to create a different look to these cards. You can add a digital patterned paper as either the background of the card (what appears as white on the original card), the block text (what appears as gray on the original card) or the black (the script writing on the card):
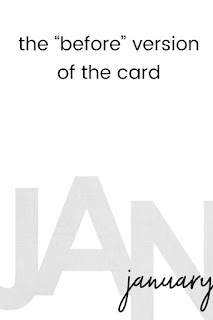 |
| This is the original version of the card. |
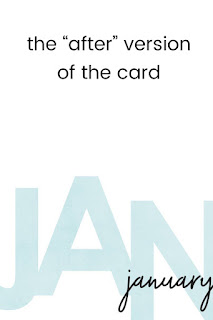 |
| This version had the gray block letter layers replaced with a blue digital paper layer instead. |
So, do you think you are ready to tackle the steps on how to do this? Believe me, if I can figure it out, anyone can!
When I downloaded the card kit from The Digital Press, I saved all the contents into my Google Drive. They were already organized into folders, so I just renamed those folders to be more meaningful to my organizational system. So I have all the PSD files saved together, and each one is named after the month and size (3x4 or 4x6) that each card is. I found the card I want to work with in my Google Drive files, and I downloaded it to the desktop of my computer. I also downloaded (from Google Drive) the different digital patterned papers I wanted to use. I found it easiest to put all the "pieces" that I will be combining into my finished product into a single folder, so I can easily access them as I create.
Okay, let's show you how I do it! First, I go online to Photopea.com and I click the big Open from Computer link on the screen.
This brings up a window where I can choose the PSD file to work from. I go to the folder that contains all my "pieces" and click on the January 3x4 card PSD file. That file then opens up in Photopea.
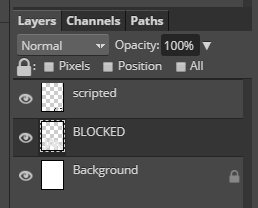
If you look at the Layers panel on the right, you can see the different layers that make up this card: the Background layer, the Blocked letters layer, and the Scripted letters layer.
For this example, I'm going to manipulate all three layers. But maybe you'll only want to play around with a single layer. That's fine (whatever floats your boat), just know that a lot of the same steps apply no matter which layer you work with, so be sure to at least read this first section, and then you should be able to just repeat these steps for the other layers you want to manipulate.
The Background Layer
I want to make the background layer of this card be the patterned snowflake digital paper. I have that saved in my "pieces" folder, so I am going to open that folder and click and drag that patterned paper on my Jan card. Just drag it right onto the top of it.
Here's a pro-tip: When you click and drag your digital papers to Photopea, you can specifically drop them where you want them in the Layer's panel. For this project I want everything I add to my Layers panel to appear right above the layer I'm working on. So I want this patterned paper above my Background layer.
If you forget and your patterned paper ends up somewhere else in your list of layers, you can easily click on it to select that layer, and then drag it down (or up) to the location you want.
You should be able to see your patterned paper on your screen. It will probably be a bit smaller than the January card itself, and that's okay. We're going to enlarge it next.
In the Layers panel, make sure that the Patterned Paper layer is selected (it will be darker than the other layers). Then, on the left side of your page, we are going to select the Move Tool (the top arrow button). Once you click that button, along the top of the screen, make sure to check the Transform Controls box.
Once you check that box, the layer you have selected (in this case, the Patterned Paper layer) will be outlined by a box on your screen.
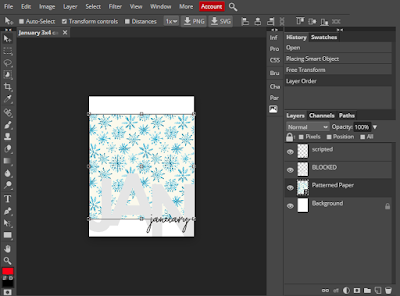 |
| See how the patterned paper has a thin box around it. |
Use your mouse to click on one of the corners of your patterned paper, right on the little square. Hold down your Shift key on your keyboard and at the same time, use your mouse to drag the square outwards, so it becomes the same size as your January card. This should enlarge the patterned paper proportionally. The area you enlarged will be partially out in the middle of the black area of the page. That's okay. That's what we want.
Note: You have to use the Shift + mouse drag method, or else you will be stretching the patterned card and your snowflake pattern won't enlarge proportionally--it'll end up all squished and weird looking. If you find that happening, let go of your mouse and click the Edit button at the top of the screen, and then click Undo. That will undo the last thing you did (which was the weird stretching thing).
When you have enlarged the patterned paper so it is at least as large as your Background layer, you can let go of your mouse, and then click in the middle of that square you enlarged. Drag the patterned paper so that it covers your Background layer completely. If you didn't quite enlarge the patterned paper enough, you can repeat the Shift + mouse drag step again.
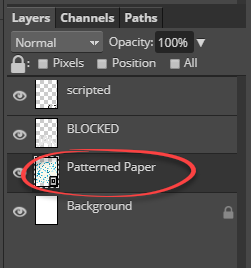
Once your pattern paper is as big (or bigger) than the Background layer, go back to the Layers panel, right-click the Patterned Paper layer and select Clipping Mask.
A couple of things will happen. First, within your Layers panel, the Patterned Paper layer will now have an arrow in front of it pointing to the Background layer below it.
And the other thing you'll see, is that when you click on the Background layer in the Layer's panel, on your Jan card, the patterned paper has taken the shape or that formerly white background layer!
The Blocked Layer
Now onto the Blocked letters layer. We are going to bring in a dark solid colored digital paper for this layer. Open your "pieces" folder and click and drag the paper you want to use and hover your mouse on the line between the Scripted layer and Blocked Layer. Essentially we are telling Photopea where in the panel we want this layer to go. You should see a dark line appear showing you where this layer will go.
Once the layer loads in Photopea, enlarge that solid color paper so that it will at least cover the Blocked letters layer. It should be the same size as the width of your card already, but look above for the steps to enlarge if needed. Then, click in the middle of the solid color paper and move it on the card so that it is completely covering those block letters.
Then select the Dark Paper layer in the Layers panel, right-click and select Clipping Mask. Your solid paper now takes on the shape of the block letters!
The Scripted Layer
Repeat thee steps above, dragging in the lighter colored digital paper and dropping it above the Scripted layer in the Layers panel.Move the paper around so that it covers up the scripted letters, and then right-click and select Clipping Mask.
If you want to change the location of a layer (like maybe move the block letters to the middle of the card instead of at the bottom). You can click on the layer you want to move--not on the paper layers but on the original layers themselves--and then click the Move tool (left side of screen, top button) The layer will appear with a box around it. Click in the middle of the box, and you can drag it around anywhere within the confines of the background.
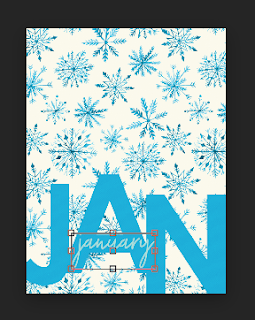 |
| You can see here, that I've selected the Scripted layer, and moved it to the middle of the card. |
Then once you've finished your creation, from Photopea's File menu, select Export As and select JPG. Then click Save. Because Photopea is an internet program. Your file will save as a download. On my computer it saves along the bottom edge of my internet browser window and I can then drag that file to the folder where I want to save it. You can also find this saved file in the main Downloads folder on your computer.
That's it! Can you see how creative you can get with this! I'm excited to create cards and use them in my PL app pages this year!


