Friday, January 26, 2018

Adding Text to Photos - Working Outside the PL app (...occasionally)

First of all, let me just share this little nugget. If you're one of the three people who actually read this blog (hi Mom!) you'll remember that I use Google Photos to store my pictures and scanned paper scrapbook pages before pulling them into the PL app. And I've talked about how I download the pictures I want to use from Google Photos to my camera roll, and then pull into the PL app from there because there wasn't a "direct route" to do so.

Well, take a gander at this youtube video my friend Steph Clay from Modern Photo Solutions made! There is a way to go straight from Google Photos to the PL app! Huzzah!


So, you'll have to try it out for yourself and see what you think. Personally it has been a little hit and miss for me, usually I can pull in the first photo, but it has trouble on any photos after that. I'll keep trying it though.

Anyway....now for the paper to digital page conversion this post is all about...
This one is a little bit different from the others I've shared so far, in that I'm going to use another app besides the PL app to add my journaling. You'll see why if you keep reading.

Firstly, here's the page I'm starting with:


Once again I had no journaling. But look at that piece of "Currency of the World" stationery I used as a background. If that doesn't scream late 1990s scrapbooking, I don't know what does! *Insert eye rolling emoji here* But I had some cute pictures, and that's what the page is mostly about, right?

So, I had this whole page scanned and saved into Google Photos, so I used the method in the video above and pulled the whole page into one of the large slots in the Big Shot 23 template.


Then I zoomed in until the picture of my son filled the space. And repeated that process for the other slot.

It was at this point that I knew there was no getting around that stationery that was going to show in the background. I had cut my photos too skinny, and if I tried to zoom in on the cutie in the pictures, by the time I "cropped" out the stationary, you couldn't see the outfit. So I decided to keep the photos as big as possible, and deal with the patterned paper.

I had those two empty card spots that I wanted to use for journaling, so I had the fantastic (if I do say so myself) idea of bringing in that patterned paper into those slots. So I went back to the original page and pulled a "blank" portion of the patterned paper into each of those slots.

I tried to use different parts of the patterned paper, so it wouldn't just look like the same "money" in both slots.
I liked the cadet blue coloring that I had matted my photos with originally, so I search through some of the PL app kits until I found one that matched pretty well (Baby Boy Edition), and added that as my page background.


Now, having done that I had pretty much made it impossible to add journaling via the PL app. I saved an editable backup copy of the page at this point so if I ever wanted to, I could come back to this version and remove the patterned paper slots and put in a PL journaling card (you know, in case a super cute new set gets released next week or something!)

But, having put those "photos" in the journaling slots, I can't add journaling with the PL app, so I'd have to go outside of the app to do it.

So I exported my page as a 12x12 and saved it to my phone's camera roll. Then I opened up the LetterGlow app (free version) and used it to add my journaling. (All I've learned to do in the LetterGlow app is from watching YouTube videos.)
This is what the app icon looks like if you searching in the App Store.
I opened the LetterGlow app and pulled in my picture from my camera roll, and added the text. I picked a size and font and color and then positioned it on the page (YouTube tutorials can show you all of this if you're interested--no use reinventing the wheel showing you here-plus I don't know how to make videos and I don't want to have you have to hear my voice on video! Ha!)

Once I had added my journaling, I saved the finished page onto my camera roll and then backed it up on Dropbox. So in total I had an editable backup of the page with the blue background and patterned paper in the journaling slots, a whole page image saved 12x12 of the page without any journaling, and then another saved 12x12 whole page image of the finished product:


Not too shabby for a few minutes work! So having learned this little trick about using the LetterGlow app to add text to photos, you can imagine the possibilities this opens up. I know that some people are "PL app ONLY" people, and that's perfectly fine. And for the most part, that's me. But every so often I want to do something that the PL app can't do, and so I branch out a little bit and use other apps.

Let me know in the comments which camp you fall into. PL app only, or sometimes combined with other apps. If so, what are your favorite other apps to use. I've tried LetterGlow and Over (similar functionality) but prefer LetterGlow.

Until next time....

Saturday, January 20, 2018

Finally Complete...It Only Took Me 18 Years!

Remember back in my first post where I talked about having paper scrapbook pages that were 80-90% finished except the journaling....and how I had actually taken the time to write (or type) out the journaling but hadn't taken the extra few minutes to actually glue it down on the page?

Here's a prime example right here:


It's soooo close to having been a completed page! I've got a million of pages like this people. That's part of the driving force behind why I'm trying to get things digital and made in the PL app--to have COMPLETE pages!

So here's how I went about finishing up this page once and for all. And better late than never seeing as how this kid in this picture is turning 20 this year! ;)

First, I scanned the page and saved it in Google Photos. For some reason, my scanner will scan individual parts of the page as separate images (I think it has to do with the white background and it thinking there are just pieces instead of a whole page image). So in Google Photos I actually have three images, one for each of the photos on the page. No big deal, those are the parts of the page I want to eventually pull into the app anyway.

So, I have three image to work with, and they are all vertically oriented, so I chose the Design X template, but cause I knew I wanted to feature the photos in a large slot, but also knew that I'd have a bit of journaling to write down, too.


I saved the three photos from Google Photos back onto my camera roll for easy access from the PL app, so I pulled those into three of the five large slots on the page.


I arranged the photos in a way that they show kind of a progression of the licorice-face mess. I wanted to also have a picture of some licorice to go with the page, but hadn't taken a photo of licorice back when this was all going down. 

So here's a little "cheat" I use sometimes. I go on a Google Image search. For those who haven't ever thought of this, you simply go to Google.com and then along the top of that main page, there should be a link for Images. Click that and anything you search for will come up with image results. So I did a search for "Red Vines licorice". Suddenly I have hundreds of images to choose from! The thing you have to be careful about is choosing a picture that is of good enough resolution so you can eventually print it without problems.

To solve this problem, when the search results come up, I look for a link towards the top of the page labeled Tools and click it. Then choose the Size option and click Large. This will limit the search results to just those with a large file size (and best resolution). Then I pick from those options and save the image I want to my camera roll.

But what about copyright? I figure that I'm not going to be making money off my pages, so I don't really worry about that. I'm not taking credit for being the photographer of the image or anything, I'm just using it for my own personal page. I don't lose any sleep over the pictures I "borrow" from Google Images.

Then I add that image to my remaining large card slot.


Now it's time for the journaling. I have a lot of blues and reds in my photos, and I remember that this all happened during the summer months, so I look through the Americana and Seasons Edition sets looking for red-white-blue cards. I like the options in the Seasons Edition the most, so from the 4x6 Journaling Card options, I pick a striped border card and add it to the remaining 4x6 slot, and add my journaling.


Then it's just the 3x4 slots to be filled. I look at the coordinating cards in the Seasons Edition set, and really like the one with the big star, so I add that to the bottom middle slot. But there isn't another filler card from that set that I like well enough to use in the last slot.  So I decide to just add the same star card in the last slot.....but with a twist....literally.


I pull the card into the slot, and then just rotate the image. Now, fair warning, not all filler cards will rotate in the PL app, it's all dependent on the size of slot the individual card was designed for. So have a back-up plan if the card you want won't rotate.

But luckily, this star card will rotate. So I tap the little rotate button and it rotates 90 degrees. I want it to be a mirror image of the other star card, so I rotate it another 90 degrees, and BAM! Another page done!  Well, except for deciding on if I like it with the blue, red, or white background the best! ;)


...and it only took me 18 years to finish! :)


Thursday, January 18, 2018

Quick Page Conversion...

Sometimes you run into an old paper scrapbook page that is really pretty easy to convert to a Project Life page. But I daresay that this will most likely not always be the case!

Nice and simple page---but with no JOURNALING! Good thing the photo has a date printed right on there or I'd have to pull out my "okay, based on my clothes and haircut, and the size of the kid, and where the picture was taken" algorithm out to try and determine an approximate date!
Since there is just the one photo, I of course want it to be the main focus of the page. And I don't really have a whole lot to say journaling wise, but at least I want the journaling ON THE PAGE!

So I look through the PL app templates that have a large photo slot....those labeled "Big Shot", and decide on the Big Shot 14 template as the one I'm going to use.


I had my original scrapbook page scanned and stored in Google Photos, but had downloaded it to my phone's camera roll for easier access. I then pulled the whole page into the largest slot and zoomed in until I had filled the space with the photo, but didn't include any of the old cardstock matte.


I wasn't really super pleased with the quality of my scanned photo. It looked a little gray to me, so I used the built in Pic-Tap-Go tool in the PL app to fix the coloring as best I could. (This tool is only available in the iOS version of the app--sorry Android users!)

I tapped the button in the top left corner of my photo which brings up the filtering settings screen. Then I tapped the Pic-Tap-Go icon.


That opens the Pic-Tap-Go app, which is a super nifty tool to use if you like to mess around with the filters that apply to your photos. My "go to" filters that I use for just about every photo I scrapbook are the Auto Color and/or Lights On filters. 


First I scroll down the list of filters and tap on the Auto Color filter, that reloads my photo with the applied filter. There's a little slide bar that you can use to adjust the effect of the filter based on what your original was. Slide it towards the Undo side, and it lessens the effect of the filter. You just have to kind of play with it to see for yourself how it works. Once I like how that filter looks applied to my picture, I scroll down the page again and apply the Lights On filter and then use the slide bar again to get the right look I'm going for. You can always just tap the Undo or Redo buttons if I don't like what you just did, and start over.

Once I'm satisfied with the look, I tap Done in the top right corner and the filters I selected are applied to the photo in my slot in the PL app.

Now it's time to tackle the journaling card slots on the page. I like the rust and forest green colors of my original page, so I select the Explore Edition cards.

There's a perfect filler card that says "Enjoy the View" which totally fits the page, so I drop that into the top slot. Then I find a journaling card with some pine trees along the bottom, which again, totally fits my page, so I add that to the bottom card slot.

The reason these two cards look like they are just one big, long card is because I have turned off Drop Shadows in my Preferences. With Drop Shadows off, there is no "edge" to the cards because the card edges are actually white and my page background is also white. If I had Drop Shadows turned on, there would be a slight gray edge at the bottom/top of the cards and you could see where one stopped and the other started. But you have to either turn your Drop Shadows on or off BEFORE you start your page, and can't switch mid-page.

When it comes to journaling, I know there are a lot of opinions about how big or how small or how consistent from page to page you should set the font size. Here's my philosophy: I type what I have to say, in the font style I like, and then I enlarge (or reduce) the size until it all fits on the card. Period. I've never had the journaling be too small to read when the page is printed and I've journaled a mini-novel on a card before.

So I add my journaling (this is another thing you can set up in Preferences--the style of font, and size that the card starts off with--which you can totally change at will.) I don't have a whole lot to say, so it doesn't fill much space on the card:


I almost always choose to center align my journaling, so I make that change, and then I increase the font size until it fills the available space on the card.


So now that my journaling is added, the page is pretty much done, except for the decision of the background color.... 

Ok, here's your change to participate as the audience! :) Here's the page with a couple of different options. Vote for your favorite in the comments!

A: White background, with Drop Shadows turned off

B: Green background
C: White, with Drop Shadows turned on
That's it! Save and backup the page and I'm done!

Tuesday, January 16, 2018

Photo Organization - Google Photos

First off, a little disclaimer:

I don't claim to be an expert on all the ins and outs of how Google Photos works. I just know what I am doing with it, and what works for me. There may be faster, better ways of doing things, but this is what I've discovered in just playing around with it.


If you are okay with that, then here we go!


Google Photos, (as I understand it) is a free photo storage service with unlimited storage capabilities.  In their own words, they offer a way to store your pictures with "Great visual quality at reduced file size."


I have my phone set up to automatically sync the pictures I take into Google Photos, since I have the Google Photos app on my phone. I can't remember how exactly I set that up, but it must have been pretty automatic when I downloaded the app, because I don't remember a whole lot of setup after that. If you have questions about setting your phone up to auto upload your photos....Google it. LOL


My iPhone doesn't have a ton of storage, so the fact that I can "off-load" photos to save space is a life-saver for me. Once I'm sure that my pictures have made it into Google Photos and into an album there (read on for info about creating albums in Google Photos), I delete the photos off my camera roll on my phone.


For me, it's easier to do the organizing of my pictures on Google Photos on the computer rather than my phone using the app. I'll try to be specific when I'm talking about the things I do on the computer in Google Photos versus in the app.


On the computer, I can see all the photos that have synced from my phone by clicking into the PHOTOS menu (one of the main buttons on the side, once you're in Google Photos).


From here, you can click on individual photos to select them. When you hover over the picture with your mouse a little checkmark icon appears in the top left corner of the picture. Click that circle to select a single picture, or a whole bunch at once. 


You'll get a blue bar across the top of your screen telling you that you have X-number of photos selected. On the right side of that blue bar is a + icon. Click it. 


This gives you couple of different options, such as creating a new album. In Google Photos, albums are like folders where you can store pictures in categories. I use the albums just like that, as a way to organize my photos.


When you click the Album option, a new screen appears asking if you want to create a new album, or if you want to save the pictures into an existing album and then lists previously created albums. Select the new album option.


Creating a new album puts your selected pictures together on the screen.  Now it's time to give the album a name. I name the folder with the year and then a short description of what the photos are all about. For example, I have albums named 2016 Graduation, 2009 Easter, 2014 Yellowstone, etc. Type a name for album and then click the checkmark in the blue banner across the top of the page to save it.


And that's it. That's how I organize my pictures within Google Photos! 

Now, once I have the pictures arranged into albums, I slowly work to get them scrapbooked. From the Google Photos app on my phone, I select an album that has the pictures I want to scrapbook with, and re-download the pictures to my phone. That process is really simple. 

First, I pull up the photo the Google Photos app, and then tap Albums along the bottom of the screen, to pull up all my albums. Then I use the Search bar to find which album I'm looking for using keywords or years (depending on how I named the album).


Once in the album, I scroll through until I find the photo I want. Then I tap the photo to bring it up, and then tap the download icon located below the photo. 


It asks me where I want to save the photo to, and (there are lots of options: send it as a text message, email it, share it with contacts, etc.) I choose to save it to my camera roll, because from there, I can access it in the Project Life app as I would normally.


I don't know why, but my phone always cuts off the bottom of these options at the edge of my phone. And I can't scroll up any further. Weird. But I've circled the button I'm talking about here.

I repeat this process for each of the pictures I want to use on my scrapbook page. 
Then I scrapbook the page like normal using the Project Life app. After I have created a page with the pictures, I delete them off the phone's camera roll again, knowing they are still saved in Google Photos.

Then I go back to Google Photos on the computer and click the ALBUMS button to bring up all my albums. I find the album the photos came from, open it up, and I change the name of the album by adding an asterisk (*) to the beginning of the album name (for example: *2016 Graduation). This is just an indicator to me that I have scrapbooked those photos. 


Believe me, you will be glad that you have some way to know what's been done and what is left to do after you've made a few hundred scrapbook pages like I did using this process last year!

I have already talked about how I back up my finished PL pages (and the editable versions)  in Dropbox. You can read about that HERE (scroll to the bottom of that post). But, if you want another backup of your finished page somewhere other than Dropbox, you can at least save the JPG version of your finished pages on Google Photos as well. 

To do that, from the Project Life app, export an image file onto your camera roll. Because I have Google Photos set up to pull photos from my phone, those finished page JPG files already show up under the PHOTOS menu in Google Photos on the computer. Then I just save the finished page photos into an album. Personally, I have a separate album labeled simply with the year: 2017 PL Pages, but I suppose it could make sense for you to save the finished pages in the same folder that the individual pictures reside. It's up to you and how your mind works!

Now for a couple of cool things that Google Photos does.  (This is best done on the computer). Once you have a several hundred photos saved in Google Photos, try clicking the ALBUMS button. One of the options along the top should be PEOPLE.


I've found that you have to have several hundred or  even a thousand or more individual pictures saved in Google Photos to get the People option to appear.  Keep saving photos and it will eventually show up!

Click on PEOPLE and you will see a collection of individual people's faces from your photos.

If you click on one of the faces, it will open a new page where it asks you to Add a Name to the face. Basically you are telling Google who this person is, and it will use some behind-the-scenes-magical algorithm to locate and "auto-tag" that person in other photos within Google Photos.


So if the person's face you clicked on is Bob, your son, where it asks you to Add a Name, type "Bob".  Google will already list all the albums that this person's photo appears in, and as the program detects that you add more photos of "Bob", it will continue to list those additional albums here on the bottom portion of the page.

Google is first and foremost, a search engine. And once you have tagged some of the faces using the above method, you will actually be able to perform a search within Google Photos for "Bob" or "Aunt MaryAnn" or any of the faces you have named, and it will locate every picture with them in it that you have stored! How cool is that? This is super helpful, especially if you know in your mind what a photo looks like, but can't remember the year or event album it's located in. Just search for the person's name and all the photos they're in display, making it visually easy to find what you are looking for (if you know what you are looking for--lol).

In my experience, (and I have stored thousands of pictures in Google Photos), I have found that the facial recognition search engine is highly accurate, even across faces that have aged considerably. But, at times, it will "mistake" a face. This happens a lot with my wife and her sisters. It thinks Janet is Carolyn, or that my mother-in-law is my wife (much to my wife's horror!) But before we get into how to correct that problem, let's talk about another similar one.

Let's say that you have begun tagging faces as described above, and you've already labeled your son's face with his name, but it pulls up another picture of your son that is doesn't recognize as him. Tap on the face and it will prompt you Add a Name again. Type in the first few letters of the name, and it will show a list of matching names you have previously added. Tap on your son's name in that list and it will ask you if the photo you tapped on is the same face as one you previously added.


If it is, click YES, and Google Photos will "learn" to recognize those features as the same. This happens a lot in photos of babies/children and their grown up counterparts.

Which leads me to the opposite problem. What if, when you do a search for "Cousin Edgar" it shows in your search results some photos that quite obviously to you aren't your dear cousin. You can also teach Google when it has made a facial recognition mistake.  When you are looking at the list of matching results, select the photo that is mis-tagged by clicking the little circle icon on the photo itself (in the top left corner). 


This will add a checkmark and select that photo (you can select multiple photos this way, too). At the top right corner of the page, click the MORE OPTIONS (three vertical dots) button, and select Remove Results. That photo will now longer show up in "Cousin Edgar" search results. Easy peasy!

So, in a nutshell, that's how I organize the pictures I keep stored on Google Photos. And every few weeks as I've upload more photos, I do a quick face-tagging round and call it good.  Pretty soon, when you click on PEOPLE, you will have a big collection of faces you've identified, and you can click on any of these to quickly open a collection of photos that person is in.


But.....you will have a collection of faces that you don't/can't identify. Google Photos pulls in EVERY face from your pictures, even those of bystanders in the backgrounds of photos, so I just identify the ones I can and leave the rest alone.

Google Photos has recently added PET face recognition! So if you have taken photos of your dog or cat (haven't had it work on pictures I took of my ducks, though LOL) you can tag those with your pet's name just like you did Cousin Edgar!

And one last thing. You can also search your Google Photos for other keywords, too. Want to quickly find pictures from the beach? Try searching for the word "beach", or "palm tree" or "ocean". Google finds pictures in your albums that it thinks match your search words!

Well, that's all I know about Google Photos, and what little I know I have learned from playing around, and from this awesome little free course by fellow Project Life scrapbooker Stephanie Clay.

Let me know your experience with beginning to use Google Photos (or if you are experienced, some tricks you've learned) in the comments!

Monday, January 15, 2018

Tackling a 2-Page Spread...

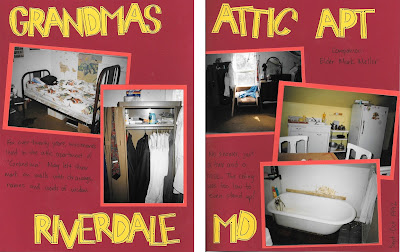
For my next project, I thought I'd tackle a two-pager from my old  mission scrapbook. This one was a little more "fancy" that the last one, with some of that letter-stencil-cut-out action I mentioned earlier. And I also did a fair amount of journaling on the page, too. But still not a fan of my handwriting and inability to write in a straight line!


This one is a little more challenging because 1) I layered the photos on the page, and 2) I glued some of them down at an angle. Since I was trying to just pull things straight into the PL app, this could be tricky.

As I mentioned in my last post, the first thing I did was to scan the two pages and save the files in Dropbox, then I downloaded them to my phone's camera roll. While the PL app (at least for iPhones) does have the ability to pull directly from Dropbox, I have found that the lag time is considerable (especially when I'm at home on wifi that's slower than a three-legged turtle) than if I just pull them from my photos.

So, I first look at the orientation of the individual photos I want to use on the page. And these pages look like there's one vertical and three horizontal--so Design A template it is!


Since I'm working with the whole page as my image, I pull that into my 4x6 card slots and then pinch and zoom and drag the photos so they are filling the space on the card. For those photos that were glued down at an angle (like the bed photo) I zoomed in close enough so that my orange matte didn't show.


I repeated those steps with the bathtub and kitchen pictures, putting them into the other 4x6 slots. I figured the "closet" picture could fill one of the smaller vertical slots, so that just left the last picture of the seat in front of the window.


I knew that I had quite a bit of journaling to add to this page, some of which I had written on the old pages and some that I knew I wanted to add. So even though that window picture could have worked in the last big slot, I opted to fit it into a smaller slot to leave more room for journaling.

I wanted to use the same LDS Missonary Elder Edition cards, but not neccesarily something in plain black and white, so I opted for navy blue instead. I had two small 3x4 slots, and a bigger 4x6 slot to fill, so looked for a pattern that was available in both sizes.


Then it was just down to adding the journaling. Here's my (not so) secret when it comes to journaling. I use my phone's Voice-to-Text feature. It saves me time and from having to type out things with my fat little fingers (doesn't help that I'm a total index-finger-only texter). I just tap on that little microphone looking button, talk into the phone, and it's done. Just be sure to double-check what it writes down, as there are sometimes errors, but no more so than when you get auto-correct errors when you type

You may or may not know this when it comes to voice-to-text, but you can actually "speak" your punctuation, too. For example if I wanted to say the sentence, "We lived in an attic apartment in Riverdale, Maryland." I would actually speak this: "We lived in an attic apartment in Riverdale comma Maryland period."  And it's smart enough to know that means to add the punctuation. Try it out and tell me about it in the comments!

So now, the page was finished--meaning every slot was filled. But sometimes, I like to mess around with the background color. In  this case, I thought that maybe something other than white might look good.


Here's a tip that not everyone who uses the PL app knows.  It's easy change a page's background color, and you can pick a color that coordinates with the cards you've used!

First, tap the grid button on the upper left corner of the app, like you were going to change the template.


That brings up a screen from which you can do several things.


A. The "Color Palette Picker" button: Tap this to open the Pick a Color Palette page. This shows all the kits you have purchased, and beneath the thumbnail of the kit are several colored dots which indicate the color options you can use to change your background.

Bonus Tip: If you just really have your sights set on an orange, or pink, or [insert color here] background, you can always pick any kit's color palette and use one of those colors. You aren't locked in to your card set's colors! :)
Tap the kit that matches the card(s) you used on the page. You'll be taken back to your page, and you'll have options of colors to choose from at the top of the page for your background (plus a selection of white, black, grays, and browns).

B. The "Square/Round Corners button: Tap this to turn on/off the square or rounded corners option. It's a simple toggle. You're switching from rounded to square with each tap (and you can visually see what each looks like on your page when you tap it).

So there you have it. Another analog to digital scrapbook page, this time taking a two-page spread and converting it into a single Project Life app page. A quick export to save the JPG file and to save the Editable Backup. And I'm done.