
There have been a lot of people in the Facebook group (Simply Project Life) that have been experimenting with the matte-effect I talked about in my last post. And I've had a few questions about how to do it for a whole-page matte, not just individual photos like I did in that last post. So here goes! The tutorial for making a whole page appear to have layers of matte around the edges.
First, create a page. However it is you want to create it. Just do it like normal, and then export that page as a 12x12 onto your phone's camera roll.
 |
| Step one: create a page. |
Then change the background color of this new page to a color you want to use as a matte. For this project, my original page had a white background, so I changed this new page background to a light green.

Then, you'll want to export this page. Don't worry that you haven't filled in the rest of the empty card slots. You'll even see a warning that tells you the page isn't complete.
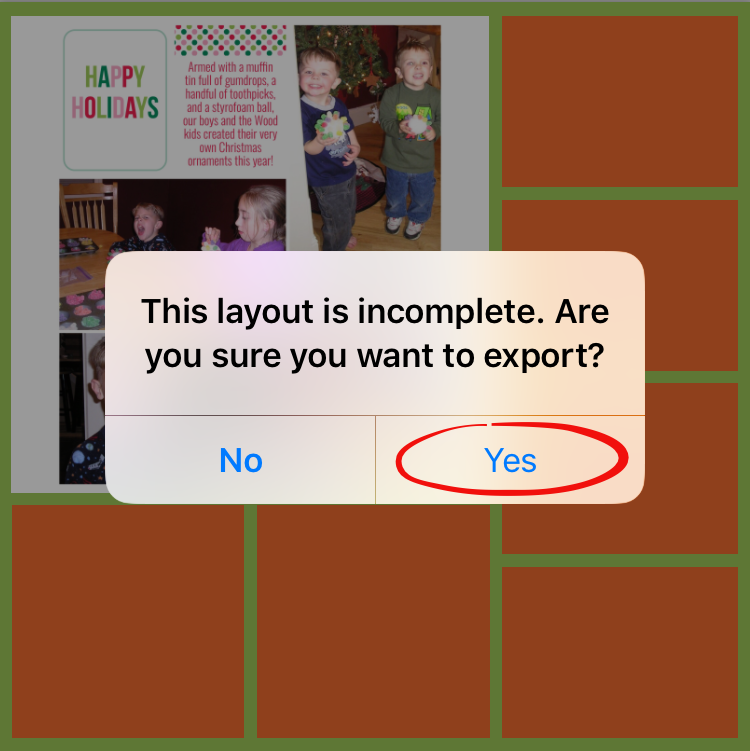
Go ahead and tap Yes. The PL app will automatically fill in all the blank card spaces with your chosen background color. Saved this page to your phone camera roll as well. It should look something like this within your camera roll:

Next step! Go into the collage section of the app (the orange wedge on the home screen), and open the 12x12 template (the first option). Pull the page with all the empty cards into that template as a photo. It will fill the template and still look like the photo above.
Take that image and pinch and drag it until you have a nice even border all the way around the edge--like a cardstock matte! This is where it gets a little tricky, especially if you have fat fingers like me! But I have faith in you! You can do it! :)
 |
| Pinch and drag until you get it just how you want it! |
Then got back to that same Big Shot Template and pull this page into that big square slot. Then change your background color to something different. In this case, I chose a red.

Then export this page (saying Yes to the warning that the page is incomplete) and save it to your camera roll, where it will look like this:

Now, I guess technically you could just keep repeating these steps over and over again until you have as many matte layers as you want, but I've kept it to two at the most and have really liked how it looks!
So, whenever you've got the layers you want, open up the collage section one last time, bring in the saved page, pinch and drag until you have an even border all the way around and then save the page one last time!
For my page, I actually saved it one last time, then used some FFT to add a title in the white area. But then I was done! :)

Very helpful! Thank you!
ReplyDeletethanks for sharing Sean!
ReplyDelete