
Part of my responsibilities as a Creative Team member is to pick one of their designer's products, kits, or collections, and then to make a scrapbook page layout with them.
This was a little bit of a challenge for me because I didn't have any digital (outside of the Project Life app) scrapbooking experience. But I'm learning. And believe me, if I can do, so can you!
I decided to walk you through my process show you how I go about creating a digital page, based on a Project Life page.
The first thing I do is to pick the photos I want to use, and pull them into a Project Life app template and position the photos in the pockets where I want them.

I knew I wanted some sort of journaling on this page, and for me personally, it's easier to journal within the Project Life app than to try and do it after I convert this into a digital page. So I needed to add a journaling card.
Now the nice thing about working outside of the Project Life app when it comes to card kits, is that there is a whole big, bright, new world of possibilities! A lot of the designers at The Digital Press create what they term "pocket cards" kits. Since the theme of my page is going to be about my favorite donut shop, I looked for a donut themed pocket card set, and found one called Hole Foods. It is a nice little kit with a few journal card options in it. So I purchased the kit, downloaded the files to my computer, saved them in a folder on Dropbox where I could access them through the PL app, and pulled one of the cards into the middle card slot as a photo.

Next, because this card is technically now a "photo" within the app, and not a true journaling card, if I want to write on it in the PL app, I need to use FFT. (Learn how to add FFT to photos HERE).

The final step I do in the Project Life app is to add a background color which will fill in all the empty photos slots when I save and export the page. For this page, I chose a yellow color which was distinct from all the other colors in the photos (that will come into play a little later on), and saved and exported the page to Dropbox, where I could access it from my computer.

On my computer, I have a folder set up with all of the digital supplies I'll need for the page. There are matching kits of Hole Foods digital scrapbook papers, and elements (basically digital 3D elements like stickers, word strips, washi tape, eyelets, etc) that I want to use, so I downloaded these files and saved them to my computer.
Then I went to an online photo editing website Photopea.com. I don't know if it's pronounced FOTO-PEE or FOE-TOPIA or FOTO-PEE-UH (I've heard it all three ways on the Youtube videos I've watched learning how to use it). But this website is like a free version of Photoshop--apparently it does a lot of the same kinds of things. I don't know how to use Photoshop, and don't have it on my computer anyway, so being told about Photopea was a happy little accident! :)
Disclaimer: I am in no way an expert on this program, nor am I probably going to call things the correct names when I'm explaining how I use it. I'll just try and explain it in a way that I hope makes sense.
So I just typed in Photopea.com in my Google search bar and pulled up the website. I start off by clicking New Project.

Next I choose a size for my "canvas" or work area. I always start off at 3000 Width x 3000 Height in pixels, which is a true 12 x 12 size. And I choose Background: Transparent. I don't know the reason for this, since I just cover it all up with my page layout anyway, but that's what the Youtube video I watched said to do. :)

That gives me a screen that looks like this. The checkered surface is my 12 x 12 page that I'm going to be building on. In the photo editing world, gray and white checkered = transparent.

The first thing I do is drag my exported, yellow PL page onto the checkered area and drop it there.
It will fill the page space and give me my canvas to work from.

Basically, Photopea is a digital editing program that is based on building layers upon layers. I want my photos and journaling card to a be a single layer of my page. So I want to get rid of all that yellow. I have found that to do that, I first have to "rasterize" this whole image. How's that for learning new vocabulary? From what I understand, when you rasterize an image, you convert it into pixels. What it was before it becomes pixels, I don't actually understand, but it's a necessary step, and an easy one.
On the left side toolbar, there is a Rectangle Select button.
 |
| See where it says "New Project.psd" ? That's the name of this project I'm working on. I'll need to keep coming back to this and clicking on that file's name to return to my "whole page" after I begin to add different layers. |
I click the Rectangle Select tool to activate it and then draw a rectangle around my whole page, so it's outlined with a dotted line. Then I go to the Layer menu along the top of the page, and choose Rasterize.

This converts the image into pixels. The next step is to tell Photopea to remove all those yellow pixels. To do that, I'm going to select the Magic Wand tool from the left-side toolbar. Some of the tools on the left-side have a small arrow in the bottom right corner, meaning there are sub-options. The Magic Wand tool is a sub option of the Quick Selection tool.

Once I have this tool selected, I'm going to click on the yellow area of the page. Because I chose a yellow color that isn't found anywhere else on the page, the Magic Wand can detect that huge yellow area as one piece, and it outlines it all in a dotted line.

Once that yellow area is outlined, I tap the Delete key on my keyboard, and all of the yellow is deleted, leaving a "transparent" grey/white checkered layer in its place.

One area of the Photopea software I want to make sure you understand is the Layers panel. This area is on the bottom right corner of the screen and shows the individual layers that make up your page. The layers of my page are all listed individually.

In the image above, you can see that there are two layers currently in this project: a Background transparent layer, and the layer that's made up of my photos. There is a small thumbnail of what each layer looks like, but these in my opinion are really hard to see. You can double-click on the name of the layers and type in your own names if that will help you keep them straight. Believe me, once you get creating, you can have sometimes 20 or more layers, so that's a good idea. I'm going to rename my photos layer as Photos.
Now we are ready to start building the page (finally!). The first thing I want to do is to replace the background layer with a digital patterned paper. To do that, I open the folder on my computer where those digital papers are stored, find the one I want, and click and drag it into what I call the "bits and pieces" toolbar. It's the small area directly above the "canvas" that is meant to hold all the pieces you want to add to your page. Currently the only thing in this area is my New Project.psd. I'm going to drag my patterned paper there next.
In the picture below, I'm dragging a patterned paper to that area.

Each new file I drag to this area opens up as it's own image on the screen.
 |
| So now you can see I have my New Project.psd and this new WWC_HoleFoods_Pattern. I can toggle back and forth between the two by clicking the file names within the "bits and pieces" area. |

Then I use the keyboard shortcut to Copy (Ctrl + C--the same shortcut as in a Word document). Then I switch back to my New Project file in the "bits and pieces" toolbar, so I'm looking at my photos and transparent background page, and then Paste the patterned paper on top it (Ctrl + V) on the keyboard.
Now if I look at my Layers panel, I can see I now have three layers for this page: Background, Photos, and Layer 1 (which is the patterned paper I just pasted).
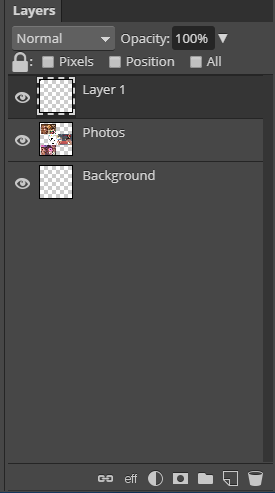
I'm going to rename Layer 1 to be Patterned Background so I'll recognize it later. I can always tell which layer I have selected in the panel, because it turns a darker color.
 |
| In this image, I have the Photos layer selected, you can see it's a darker color than the other layers in the list. |
Now if I look at my New Project page, I can actually see that my patterned paper is underneath my photos.

Pretty snazzy, eh?
Now I can add as many other elements to the page as I want, layer upon layer, following the same steps as I did with the patterned background.
- Drag and drop the digital item (paper, embellishment, etc) into the "bits and pieces" area.
- Use the Rectangle Select tool to draw a box around the element.
- Copy it, then switch back to the New Project version of the page, and Paste it there.
When I add elements that are smaller than the 12x12 canvas of the page, after I paste them onto the page, I'm going to have to move them around and position them where I want them.
I want to add a digital donut sticker element to the page. I have followed the steps above, and now after I did the Paste step, I have the donut sticker right in the middle of my page.....which is not where I want it!
 |
| Right now the donut sticker is right on top of my journaling and photos! |
So, remember how I said that everything I add to the page is in layers? If I look at the Layers panel, the one that is selected is that donut sticker. When new layers are added to your page, they are named Layer 1, Layer 2, etc. That donut sticker actually came in and was named Layer 1, but I renamed it Donut Sticker. Now to move it where I want it.

I can see that the Donut Sticker layer is at the top of the list, so it's also the top layer on my page, meaning it's going to cover up whatever layer is beneath it.
To move that layer around, I make sure it's selected (dark in the Layers panel), and then I click the Move Tool from the left-side toolbar and then along the top, make sure that the Transform Controls box is checked.

Transform Controls puts a box around the selected layer (the donut sticker) and gives me the ability to move it around the screen to position it.

I can click and drag the object wherever I want it to go on the page. I can also rotate the item, enlarge, or shrink it by grabbing on to any of the square "handles" on the box around the image and clicking and dragging. If I want the object to enlarge or shrink proportionally, I'll need to hold down the Shift key on my keyboard when dragging it bigger or smaller. Otherwise, if I don't use the Shift key, I'll just squish or stretch the image. To rotate the image, I'll move my cursor to one of the corner handles and it will change to a rotation icon. I can then just drag my mouse in the direction I want the image to rotate.
 |
| You can see in this image that I'm in "rotation mode" because of the black double-ended, curved arrow icon. |
First, I'll drag and drop the new element into my "bits and pieces area". This new element happens to be another full sheet of patterned paper that I want to use just a strip of. So when I first drag and drop it into the "bits and pieces area, I can see the whole sheet.
Instead of using the Rectangle Select tool, I'm going to use the Crop tool (from the left-side toolbar) and draw a tall skinny shape on the patterned paper with my mouse.

When I've got the shape I want, I'll click the Checkmark button at the top of the screen (see above) and that will crop the shape from my full sheet of paper.

Then, I'll switch to the Rectangle Select tool, draw a box around the strip I just made, Copy it, and go back to my New Project page and Paste it there.
This new layer shows up in my Layers panel as Layer 1, so I'll rename it Strip, and then drag that whole layer in the panel until it's between my Photo and Patterned Background layers (see image below).

Then I'll make sure that Strip layer is selected in the panel, switch to my Move tool from the left-side toolbar, and use the mouse to drag that layer to where I want it on the page.

From here, you just continue to add elements, position them on the page, & layer them like you want until you've got a finished page!

There are some more advanced things I've done to this page, like adding drop-shadows and things, but you get the main point, right? Maybe I'll do another blog in the future about those advanced things, once I've experimented a bit more and get a process down.
I've never heard of Photopea before, but I'm excited to try it! Thank you for the helpful tutorial!
ReplyDeleteAwesome tutorial! I hope you do more.
ReplyDelete