
If you've been using the Project Life app for as long (or as much) as I have, you get to a point where you just wish there were some different card options! There are only so many Halloween or Christmas or [insert holiday or event here]-themed Project Life card kits. And eventually you will have used them all on one page or another!
If you are the kind of person who wants to use the same kit for every birthday/wedding/campout/etc. page you make, good for you. But I'm not that person.
My family goes to Bear Lake (here in Utah) every summer and several other times throughout the year. And we take pictures each time we go. And then I make scrapbook pages from those pictures. And I've used every possible combination of cards on those pages and just need more options!
There are dozens (probably hundreds) of digital scrapbook designers who actually make pocket-sized cards that work perfectly for Project Life pages. So I'm here to show you just how easy it is to use them!
Disclaimer:
The process I'm about to explain uses Google Drive (both the computer and app versions), and the FFT (Free Form Text) add-on feature within the Project Life app. And I'm an Apple guy, so I don't know how well/if this will work exactly the same on an Android device.
Okay? Okay. Here we go.
First, I pull up the Project Life app on my phone and pick the template I want to use. Then I put my photos in the card slots.
 |
| This is template Design 7, and I added an frame overlay on the left corner photo from the Just Add Color Overlays kit. |
Now, I have previously purchased some digital scrapbook kits with pocket card elements and saved them on my Google Drive. If you need a refresher on how that process works, click HERE.
To get non-PL cards in pockets, I leave the Project Life app open on my phone/device and just switch over the the Google Drive app.
In the Google Drive app, I first tap the Files button at the bottom of the screen (1), and then the folder that contains the digital cards I want to use (2).


Then I tap to open it and see the different card options.
 |
| In this instance, I know I have horizontal, rectangular pockets, so I'm choosing the 6x4 version of this card. |

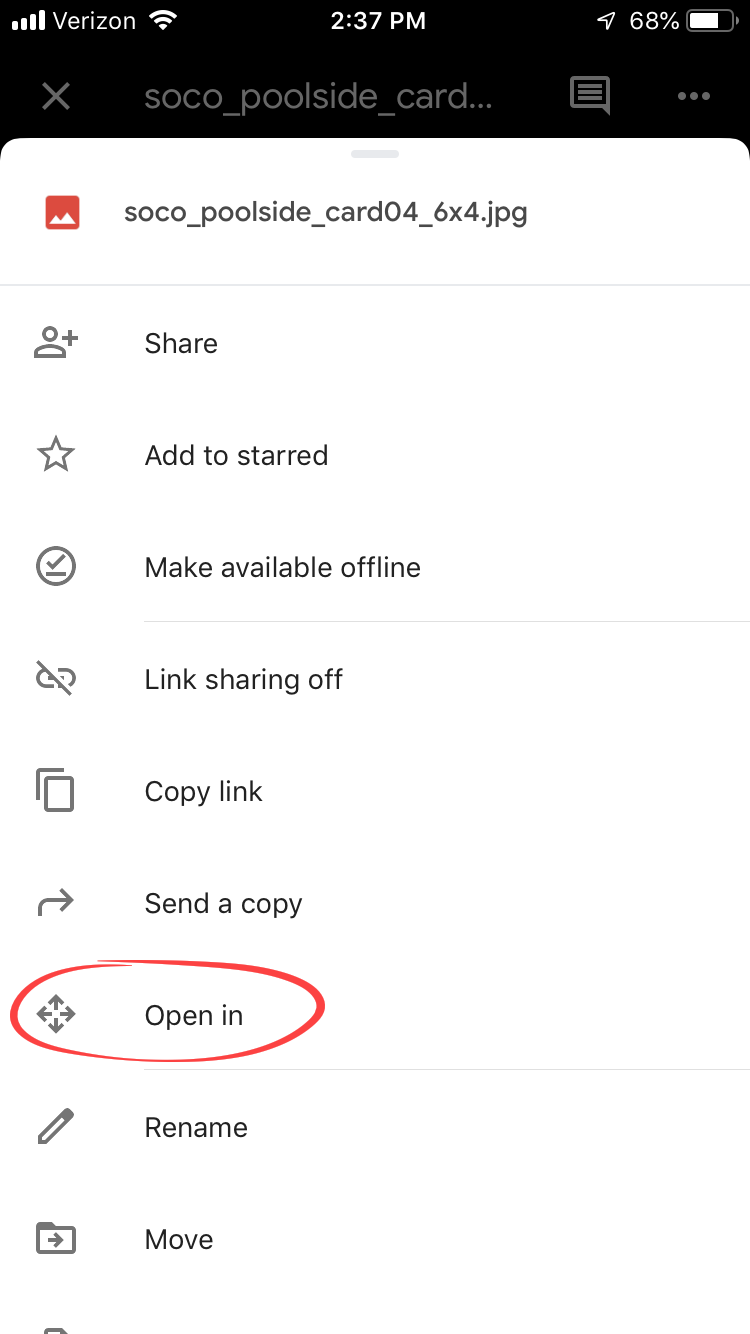
That will open different options of what to do with the card. I'm going to tap on the Open in option.
That brings me to a screen that wants to know which phone app I want to open the pocket card in. Naturally, I'm going to select Copy to Project Life.

My phone then switches back to the open page in the Project Life app, and has the card image from Google Drive selected and instructs me to tap the pocket I want the card to go into. I tap on Place Image, and then tap on the pocket on my page.

And, as if by magic, the outside-the-PL-app card, plops into the selected pocket!

From here, I can do all the things I can do with photos, to this card. I can use the Pencil icon (1) to add text to the card using FFT, and I can use the Adjustment icon (2) get to the rotation options.


And that's pretty much it! Repeat these steps to add additional cards to those empty page slots. This opens up new worlds of creativity by not limiting yourself to only PL app cards for your pages!
 |
| This final version of the page has the same card brought into four different pockets, with each card being rotated 90 degrees so the darkest blue of the card is on the outside edge of the pocket. Then another outside-the-PL-app card (a blank card with a big "&" on it) brought into the top right pocket with FFT added. |
I have some digital elements I purchased from Simple Stories that also included pocket cards. After reading this I followed your instructions, uploaded those cards to my Google Drive and used them in the Project Life App! I am so excited! I will be going on a shopping spree now 😁
ReplyDeleteThat's awesome Jen, it's always good to know that my rambling is understandable! ;)
DeleteI did it! Easy once someone tells me how. Lol. Thank you.
ReplyDeleteOh good! Glad you could figure it out from my ramblings! :)
Delete